Template:CurrentVersion
-
← Older revision Revision as of 15:04, 21 November 2024
Line 1: Line 1:
−
6.7
+
6.7.1
21.7.10
Natural Solutions: Design Solution with product spotlight
Working on body now that header is about complete. After reviewing the clients product inventory list, I decided to feature each of the vendors top sellers on the home page. I offered to provide copy for the client who has been to busy to contribute much. I chose a quote by the owner from a local newspaper article to use for the slogan text. She was very pleased. I'll use the article and brochure text I was given for the Welcome / About Us pages. Still waiting on content for services and FAQs.
4.7.10
CBC Project: Repair curb & brick in church photo
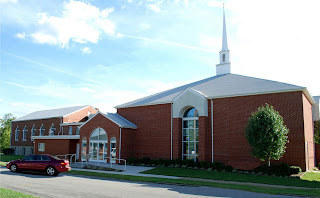
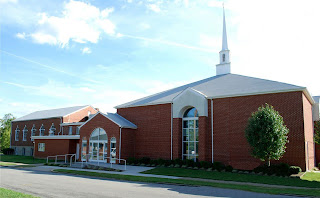
This was the results of my revisions to the church photo so far. (taking out phone line & parked car in previous posts)

I decided to continue inmprovements by fixing the crumbling curb, extending the newer lighter concrete sidewalk and lawn using Vanishing point techniques. In another layer I use VP to select and paste a better version of the brick I previously stamped in place of the removed car. I used the burn tool to age it a bit, then added a little more to the shrubs.

I decided to continue inmprovements by fixing the crumbling curb, extending the newer lighter concrete sidewalk and lawn using Vanishing point techniques. In another layer I use VP to select and paste a better version of the brick I previously stamped in place of the removed car. I used the burn tool to age it a bit, then added a little more to the shrubs.
Labels:
CBC,
photo editing,
Photoshop,
stamp tool,
vanishing point
3.7.10
CBC Project: Removing and moving objects in photo
The original photo of the church has a lot of clutter that needs to be removed: telephone lines criss-crossing the beautiful clouds and blue sky and a car parked in front.
My first challenge was to remove the telephone lines. ( Methods explained in previous post.)

As my son would say, "Just for the LOLZ" I moved the car down the street. Basic steps: duplicate original layer, use move tool to place it down the street, trnasform tool to resize and distort to look natural in the perspective, duplicate the resized car, select the layer for the resized car go to EDIT>FILL... select 50% gray, rename layer shadow, use transform options to orient the shadow. I also used FILTER> Motion Blur to smooth out jagged edges of shadow shape. Last I created an elipse, filled with black #000000 for the darker shading under the car. (I used the original car as model) Last of all, I selected the moved car and desaturated to give it the effect of distance.

Here's the last revision removing the car completely! I used a combination of techniques to get rid of the car and create a landscape in its place. This was extremely complicated, because of so many elements with different textures colors and shapes. I duplicated the car so the original wouldn't be destroyed in the process. I selected the car with the Magnetic lasso, then began the painstaking long tedious all night task of using the Clone Tool (Stamp Tool PS-CS4) to select, copy and stamp a thousand sections into the area of the selected car. After deselecting the car there were still areas outside of the selection that need to be edited. I used the Vanishing point techniques to create several panes for the finishing the details of the landscaping. I used one pane for the road to extend the shadow left behind. I used panes for the different shades of grass and extended the dark shaded grass to the end of the photo over the sunlit grass so the foreground would be the same. I got very detailed by using separate panes to build up the flower bed and extend corners of the landscaping logs on the corner of the building. Obvious the shadowing is not accurate to the laws of light & perspective, but it looks natural enough.
My first challenge was to remove the telephone lines. ( Methods explained in previous post.)

As my son would say, "Just for the LOLZ" I moved the car down the street. Basic steps: duplicate original layer, use move tool to place it down the street, trnasform tool to resize and distort to look natural in the perspective, duplicate the resized car, select the layer for the resized car go to EDIT>FILL... select 50% gray, rename layer shadow, use transform options to orient the shadow. I also used FILTER> Motion Blur to smooth out jagged edges of shadow shape. Last I created an elipse, filled with black #000000 for the darker shading under the car. (I used the original car as model) Last of all, I selected the moved car and desaturated to give it the effect of distance.

Here's the last revision removing the car completely! I used a combination of techniques to get rid of the car and create a landscape in its place. This was extremely complicated, because of so many elements with different textures colors and shapes. I duplicated the car so the original wouldn't be destroyed in the process. I selected the car with the Magnetic lasso, then began the painstaking long tedious all night task of using the Clone Tool (Stamp Tool PS-CS4) to select, copy and stamp a thousand sections into the area of the selected car. After deselecting the car there were still areas outside of the selection that need to be edited. I used the Vanishing point techniques to create several panes for the finishing the details of the landscaping. I used one pane for the road to extend the shadow left behind. I used panes for the different shades of grass and extended the dark shaded grass to the end of the photo over the sunlit grass so the foreground would be the same. I got very detailed by using separate panes to build up the flower bed and extend corners of the landscaping logs on the corner of the building. Obvious the shadowing is not accurate to the laws of light & perspective, but it looks natural enough.
Labels:
CBC,
photo editing,
Photoshop,
portfolio,
stamp tool,
tools,
vanishing point
No pixels are selected?
Why, when trying to make a selection within a layer with my lasso tool, do I always get a pop up that says"No pixels are selected" ? One reason for getting this message is failing have the layer active which has the object you are trying to select. But I am sure that I am in the correct layer which is not an adjustment layer. The marquee tool works but its not a useful option for the "car" I am trying to select within this photo. For now I am switching to the polygonal selection tool.
Hmm, I see this is also weird. There's a long delay from one point to the next. Perhaps it the problem is the file size of the photo causing everything to move so slow, that the dragging of the lasso won't compute at the speed of my hand....
File size under 200kb.
UPDATE: After restarting PC. Alls well. Lassoing just fine. Boy did we waste alot of time. When in doubt ALWAYS RESTART PC.
How can I get rid of the Hand in Photoshop!
In the middle of a project one day, I try to switch to a tool but instead of the apprropriate tool I get the "hand" instead! I kept switching to different tools. No luck! Finally I Google "How can I get rid of the Hand" and got various answers. Most worthless. But someone, said "hit the space bar." It works. This has happened repeatedly since the first time and I always waste time before remembering the remedy. So I decided to document the answer in my own blog.
CBC Project: Removing objects from photo with Photo shop stamp tool and vanishing point.
Finally found this photo for Central Baptist Church web site. Its a full view of the from. No weird artifacts, but I'd like to get rid of thee telephone lines and the car. Using the Photo shop stamp tool and vanishing point...
- I duplicated the original layer(above background)
- Created new layer above "background copy" Named it "remove telephone lines"
- Using stamp tool to remove telephone lines from clouds and sky ONLY.
- Go to Filter > Vanishing point. Create grids for each plane on church roof, window, brick sides, etc that telephone line intersects
- Use selection tool to select matching sections; ALT CLICK selection and move and paste over the telephone lines.
- Helps to keep toggling the zoom back and forth so you can see pixels for editing and out to see how it looks at 100%
- click OK when satisfied. Hope I didn't forget any steps.
Labels:
CBC,
photo editing,
Photoshop,
stamp tool,
vanishing point
1.7.10
Natural Solutions: Second Design Solution with new graphics for artwork
As I explained in previous post, I have render a layered vector image almost exactly the same as the original artwork from which I could select and re-size any element of the drawing. I decided to select just the "flowing hair lady silhouette" and re-size it...

I also created a new version of the florets which has more detail and dimension than the original...

I put various sizes of the florets with the resized lady to recreate the artwork for the web page. I also intend to use the florets as a continuing motif in the design: as part decoration, navigaton & rollovers;

This is still a preliminary rendering of the second design solution. Once more of the content has been established, I will determine the layout and arrangement of flourishes. I may also add the background orange "waves" like the original once the other elements have been established. Must choose font and style the text for site name, etc. Plan to adjust the dimensions and fix the browser display dimensions to display the artwork-header to fit the entire browser window.

I also created a new version of the florets which has more detail and dimension than the original...

I put various sizes of the florets with the resized lady to recreate the artwork for the web page. I also intend to use the florets as a continuing motif in the design: as part decoration, navigaton & rollovers;

This is still a preliminary rendering of the second design solution. Once more of the content has been established, I will determine the layout and arrangement of flourishes. I may also add the background orange "waves" like the original once the other elements have been established. Must choose font and style the text for site name, etc. Plan to adjust the dimensions and fix the browser display dimensions to display the artwork-header to fit the entire browser window.
Labels:
graphic design,
Inkscape,
natural solutions,
Photoshop,
web design
Subscribe to:
Comments (Atom)


 ShareThis


