Showing posts with label portfolio. Show all posts

26.7.11

SZW Schwarzwald Music Website | Final Logo


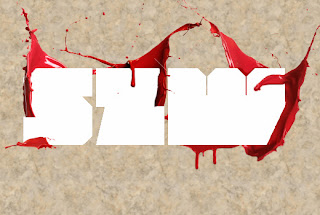
After numerous trials with filters and blend options I came up with a unique sophisticated slick marble text effect that isn't the usually 3-D blocks of stone. Then I added extensive detailing of shadows and lighting effects for each splash component. I presented the final "lipstick grunge" logo on a darker grungy aged mossy green marbleized canvas.  (click image to enlarge)

25.7.11

SZW Schwarzwald Logo | Photoshop development

Click images to enlarge.
 I created a custom pattern with a seamless real marble texture similar to his mockup. Typed "SZW" as plain text using MOD font on marbled canvas. Originally client wanted to keep text effect simple and white underneath the liquid splashes.

To avoid the "cheesiness" of plain white, I suggest adding a white satin effect created with a barely visible gradient and grey 1 px stroke.
  For some depth add very low opacity outer glow to float letters over marbled canvas.
Keeping in mind we are trying to create a new unique styling concept he has defined as "lipstick grunge" I used his original splashes in different positions in a deeper red color (instead his original orchid deep pink color) to achieve the dual impression of blood and lipstick. 

In order to achieve the effect of wrapping arround indiviual letters, I retype each letter as single character in its own layer directly over "SZW" layer. Then duplicate each rear splash on top of corresponding letter. Then used layer mask to erase splash pixels covering letters and reveal only splash pixels covering letter.

 I transformed some splashes to smaller sizes I could insert between individual letters.
 I revealed original "SZW" text layer (all 3 characters together) with outer glow underneath.
 Added low opacity inner glow to each letter. 
I cut out some small speckles from splashes to cover some space for better visual composition and increase impression of liquid movement. 

Arrows point out the subtle discrepancies in realistic lighting and shadowing on the splashes.

 I used levels and contrast adjustment layers to achieve a more realistic lighting and shadow effects on each splash layer.
I used non destructive dodge/burn technique to fix additional shading on interior components
Client full approved design so far, but we decided to allow me to come up with a "marbled" text effect.


14.7.11

Revised Logo: Website name change to Mirror Connect

- click image to enlarge -
Well, the site name is to be mirrorconnect.net.  ( domain name mirrormatch unavailable) Although revised logo lacks some of the the visual symmetry of mirror match, I actually liked mirror connect better for conveying "social network" aspect of the site. It broadens the audience for the site beyond just romantic relationships.

18.2.11

Nuli! Nuli! Project: Final mockup

Final mockup approved by client. Improved design solution for buttons.

21.9.10

Natural Solutions: Designing And Generating Favicon

Created a 256 pixel square image for Natural Solutions for various iconic uses. The first purpose I had in mind was the website's favicon. The flowing hair does not show up against the background colors in the original icon when sized down to 16 pixels. So I created another favicon with a transparent background because the flowing hair is the more important visual to my client. AS I have already encountered, the flowing tresses just do not lend themselves to square layouts. Its chose to clip them rather than reduce the overall size to squeeze into a square. The original can be use as a social networking avatar.

NOTE: Favicon have to be 16 pixel square image in the .ico format. The original image may be created larger then scaled down by an online favicon generator; but original size must be a multiple of 16. I chose 256 as a manageable size to design in photoshop. Watch this TutVid for complete instruction on creation and code placement in web pages.

15.8.10

Natural Solutions: Detailing the Welcome Page

Although the client was satisfied with the previous design solution, I was not. I moved the owners quote from the header to the body where its more readible. I added some rounded corners to feature text and images on the welcome page. In addition, I added some standard buttons to link to sub pages. A "continue" button will link welcome text to the About Us page. Each featured product has a "details" button to link to its section on the Products page. I colorized some gray-scale social networking icons to match. I hope I won't regret when I begin to slice & code this. live website

3.7.10

CBC Project: Removing and moving objects in photo

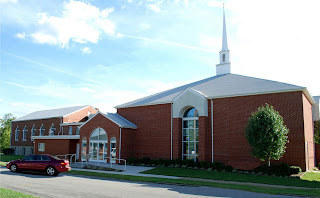
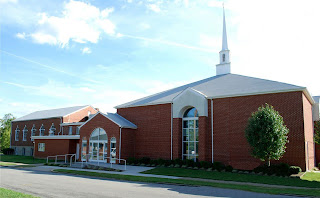
The original photo of the church has a lot of clutter that needs to be removed: telephone lines criss-crossing the beautiful clouds and blue sky and a car parked in front.
 
My first challenge was to remove the telephone lines. ( Methods explained in previous post.)


As my son would say, "Just for the LOLZ" I moved the car down the street. Basic steps: duplicate original layer, use move tool to place it down the street, trnasform tool to resize and distort to look natural in the perspective, duplicate the resized car, select the layer for the resized car go to EDIT>FILL... select 50% gray, rename layer shadow, use transform options to orient the shadow. I also used FILTER> Motion Blur to smooth out jagged edges of shadow shape. Last I created an elipse, filled with black #000000 for the darker shading under the car. (I used the original car as model) Last of all, I selected the moved car and desaturated to give it the effect of distance.

Here's the last revision removing the car completely! I used a combination of techniques to get rid of the car and create a landscape in its place. This was extremely complicated, because of so many elements with different textures colors  and shapes. I duplicated the car so the original wouldn't be destroyed in the process. I selected the car with the Magnetic lasso, then began the painstaking long tedious all night task of using the Clone Tool (Stamp Tool PS-CS4) to select, copy and stamp a thousand sections into the area of the selected car. After deselecting the car there were still areas outside of the selection that need to be edited. I used the Vanishing point techniques to create several panes for the finishing the details of the landscaping. I used one pane for the road to extend the shadow left behind. I used panes for the different shades of grass and extended the dark shaded grass to the end of the photo over the sunlit grass so the foreground would be the same. I got very detailed by using separate panes to build up the flower bed and extend corners of the landscaping logs on the corner of the building. Obvious the shadowing is not accurate to the laws of light & perspective, but it looks natural enough.

15.5.10

Create Custom Banner for Web Template

 This is the first header I designed in Inkscape to replace the generic template header for the CBC website.


Now that I have a created a neat little vector image of the steeple I designed a unique new banner that includes the church motto.
Related Posts with Thumbnails